Browsing Tag

NVidia

NVIDIA RTX Voice

Remove microphone noise FREE with revolutionary Nvidia RTX Voice

This COVID-19 situation has many of us working, studying, and streaming from home. But for many, this may be a very difficult task, due to unavoidable sources of noise around them. NVIDIA RTX Voice to the rescue!

The sound of kids running and screaming in the back, dogs barking or mechanical keyboard strokes might be extremely difficult to muffle and may affect your performance or credibility.
You might at first want to gag your kids, but this tool might just solve your problem.

Oftentimes, however, the issue is on the other end of your Teams video call with very loud video partners.

To tackle this, NVIDIA has developed a technology that is currently in a free beta stage. This is called NVIDIA RTX Voice.

Oh, you don’t own an RTX graphics card? Don’t despair!

Even though it is “officially” limited to the RTX range of NVIDIA video cards, we’ve found a way around that and you’ll be able to use it with your non-RTX video card.

Fixing sound with graphics cards?

As many of you might know, dealing with sound has been a reference of what’s trickiest to do in computer sciences since its inception. The fact that it requires very fast computational power demands specific processors and tools to handle sound efficiently.

Ray-tracing in computer graphics has exactly the same problem.
Considering this, then it might come as no surprise that NVIDIA has now tackled complex real-time sound processing with RTX graphics card software.

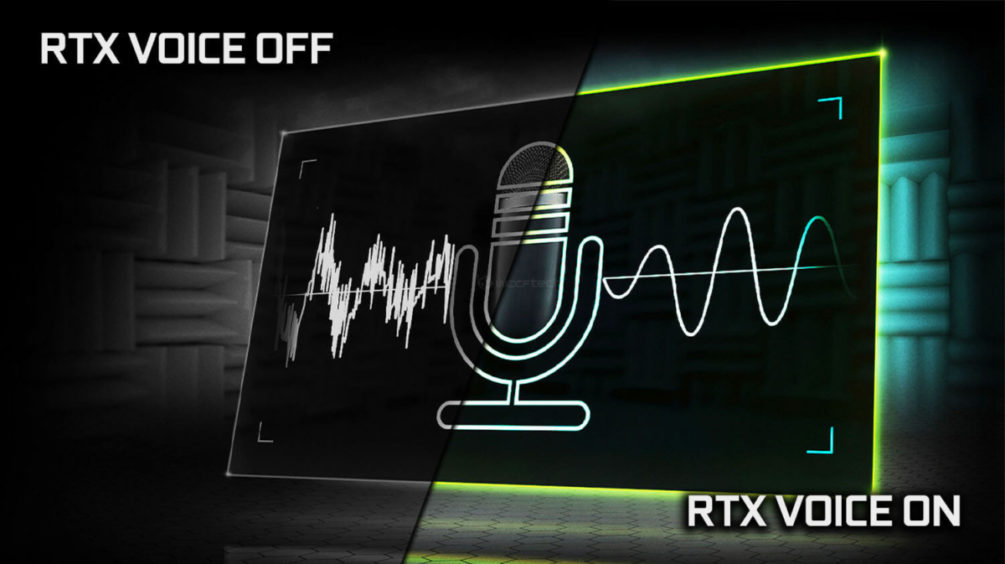
Nvidia RTX Voice is surprisingly good

There have been many ways to subtract or reduce background noise. However, NVIDIA’s AI solution seems to clearly outperform other approaches.

As a reference, I was talking to my microphone while violently punching my table and having my girlfriend yelling next to me (please note: not at me). The results of NVIDIA’s RTX Voice were outstanding.

My voice did have a slight fluctuation in volume as I hammered the desk. But considering how much noise we were making, in the final recording, I was unable to hear anything else but my voice.
I would say that the result was pretty good and well worth the try.

As a reference, my non-RTX graphics card is an NVIDIA GTX 1080 non-TI. Using this software did increase my old CPU load by 5%, which is perfectly manageable if you toggle it off after each call.
RTX cards shine brighter because the loads for RTX cards are minimal.

How to install NVIDIA RTX Voice

If you own an RTX graphics card, things are easier to set up.
Simply go to NVIDIA RTX Voice’s official website and follow the instructions they provide.

If, however, you DON’T own an RTX NVIDIA graphics card, there’s still a way to make it work.

NVIDIA RTX Voice
NVIDIA RTX Voice

If you own a non-RTX NVIDIA graphics card, you’ll need to manually remove the constraints from the installer. They prevent you from installing the tool in non-RTX computers.

To install it in your non-RTX computer, follow these instructions from the Guru3D forums:

  1. Go to NVIDIA RTX Voice’s official website and download the free beta version (v0.5.12.6 – 386Mb).
  2. Run the file you downloaded. A message stating that your graphics card is not compatible is expected and the installer quits to desktop.
  3. Go to your C:\Temp\NVRTXVoice\NvAFX folder and open the file RTXVoice.nvi with a text editor such as Notepad.
  4. Search and remove a section that reads:
    <constraints>
    <property name=”Feature.RTXVoice” level=”silent” text=”${{InstallBlockedMessage}}”/>
    </constraints>
  5. Save your file and run setup.exe, located at C:\Temp\NVRTXVoice\
  6. Proceed with the installation and follow the configuration instructions at NVIDIA RTX Voice’s official website.

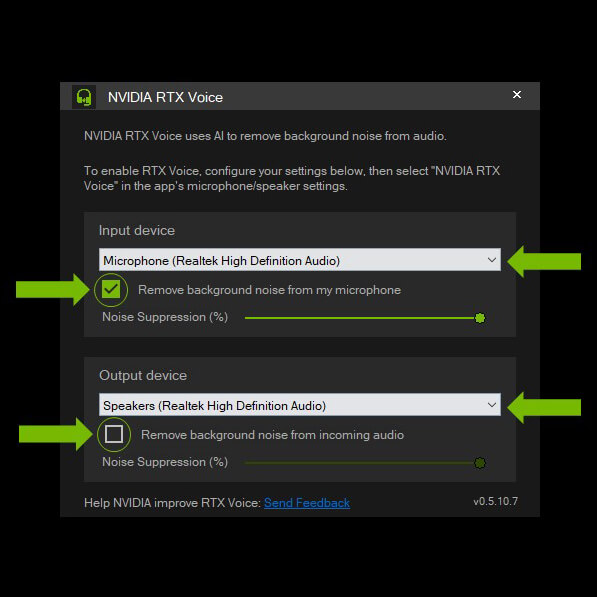
Using this tool to minimize your own background noise is pretty simple.
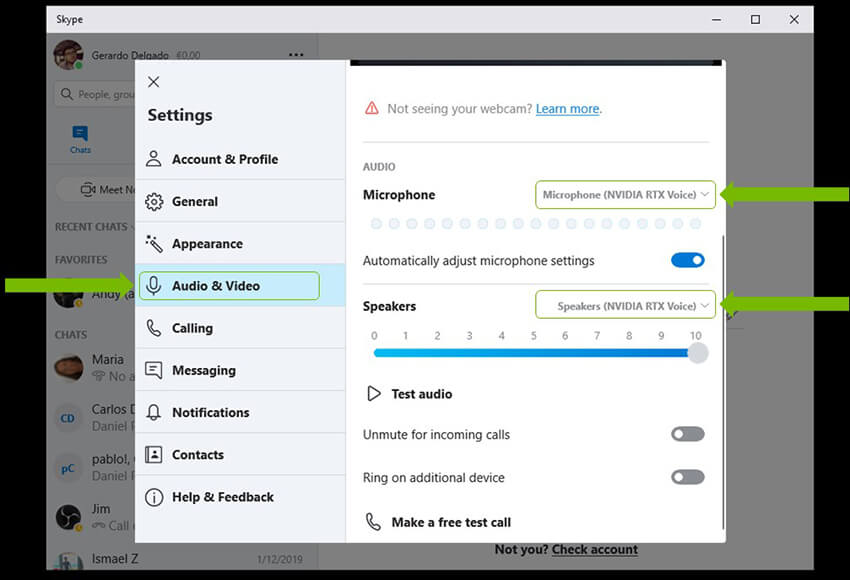
Just run the app and select your microphone as your input and your regular output (usually speakers). Then go to the tool you wish to use such as OBS for streaming or Skype for meetings. Finally set NVIDIA RTX Voice as your microphone input.

NVIDIA RTX Voice

If instead, you wish to protect your ears and sanity from loud or obnoxious meeting partners, there’s a solution as well.

You are able to set your output device on Teams, Zoom, or Classroom as NVIDIA’s RTX Voice. Then all you need is to set NVIDIA’s RTX Voice’s output to your speakers/headphones.
If you’re having trouble setting up this sound route, you might want to try the free donation-based Voicemeeter Banana/Potato, which gives you full control over input/output paths for sound.

Peace at last

Whether you are a Twitch streamer with a loud mechanical keyboard, using Discord or OBS, or having a Teams meeting that your kids are keen on ruining, or even attending classes via Skype, Google’s Classroom or Zoom, this tool will help you muffle your background noise but also protect your ears from everyone else’s noise as well. The results are stunning and well worth a try.

Let me know how it worked out for you!

If this helped you, consider subscribing to Popcorngamer.com!
-ViLa4480

Red Dead Redemption 2

Red Dead Redemption 2 – Fix Ultra-Wide Resolution

Extend your ride into the sunset!

I just recently decided to hop into Westworld… I mean, Red Dead Redemption 2 on PC knowing that this would be a game I would enjoy.
I’m currently writing a review for it (If only I could stop playing it to write my review…).

Unfortunately, just like its older brother, Grand Theft Auto 5, it doesn’t natively support my NVidia Surround ultra-wide screen resolution for my triple-screen setup.

How to set triple-screen ultra-wide 5760x1080 on Red Dead Redemption 2
Click for a higher resolution.

This fix may not be required for everyone, but for some reason, the resolution simply didn’t show up on the game’s graphical settings. It only went up to 1920×1080.

Just to be clear, I’ve got 3 monitors and I’m also a streamer on Twitch with a streaming computer that uses one of my screens when I stream, which automatically changes my screen resolution to 3840×1080 – I’m using DisplayFusion to achieve this behavior. Plus HDMI routers, DVI adapters, screen recorders… Not even my computer understands what’s going on with my screen resolutions.

In this post, I’ll be going over several ways to fixing your screen resolution.
Please consider this a repository of suggestions. I can’t promise that they’ll all currently fix the issue, but they have worked in the past. Give it a try and let us know which one worked for you!

How to fix ultra-wide surround screen resolutions the easy way with Launch Arguments

Before following through this post for more in-depth fixes, check out a tool I developed to help you set up Red Dead Redemption 2 launch arguments. One of the sections on that tool is specific to screen resolutions. It also helps with performance, bugs, stuttering, etc.

Go check it out at this page: PopcornGamer’s Unofficial Red Dead Redemption 2 Launch Argument Composer.

If it helps you, let me know!

This fix should make the game run in any screen resolution.

UPDATE: As of the last patch, it seems like some of these tricks aren’t working for some users. Check the bottom of this post for alternative ways to make it work! Leave me a comment if it does!

A couple of years ago I posted a video on Youtube explaining how to make GTA V work at 5760×1080. Guessing that the engine was the same I thought about doing the same on my blog, but this time regarding Red Dead Redemption 2.

Apparently, the game engine has progressed quite significantly since GTA V. Back then, I managed to find a work-around for GTA V, but RDR2 seems to accept 5760×1080, much more easily.

To make 5760×1080 work, I had to go through My Documents folder and find the Rockstar Games folder. Within it, the Red Dead Redemption Folder and then the Settings folder. In it, you should find a file called system.xml

How to set triple-screen ultra-wide 5760x1080 on Red Dead Redemption 2

In my computer this is located at:
C:/Users/[windows username]/Rockstar Games/Red Dead Redemption 2/Settings/system.xml

In this file, down at the bottom, you’ll find:

<video>
    <adapterIndex value="0" />
    <outputIndex value="0" />
    <resolutionIndex value="14" />
    <screenWidth value="5760" />
    <screenHeight value="1080" />
    <refreshRateIndex value="0" />
    <refreshRateNumerator value="50000" />
    <refreshRateDenominator value="1000" />
    <windowed value="2" />
    <vSync value="0" />
    <tripleBuffered value="false" />
    <pauseOnFocusLoss value="true" />
    <constrainMousePointer value="false" />
  </video>

Here, you should set the screenWidth and screenHeight to your desired screen resolution.
After this step, you should save and close the file and then right-click on it and go to File Properties and set it to Read-Only. This prevents the game from making any changes to it. Keep in mind that setting this to Read-Only will keep you from saving adjusted game settings from within the game. This means that if you make any changes in-game, the settings will be reset every time you launch the game.

Also note that, for even more exotic users, if you’re using several screens but only wish to use one set of them, then you should change the outputIndex and/or the adapterIndex value. This may only be required if you’re using more than 3 screens, or when you’re having trouble with stretching or positioning on 2 screens.

How to set triple-screen ultra-wide 5760x1080 on Red Dead Redemption 2
The cowboy rests.

Alternatively, if this change fails to set your resolution correctly, try following my GTA V video which uses windowed mode and a piece of software called ResizeEnable.

An updated method to get 5760×1080 in RDR2!

As of the last update, it seems like some of these tricks aren’t working for some users. Instead, try using the command line.

Go to your Rockstar Games Launcher -> Settings -> Red Dead Redemption 2 (on the left sidebar) -> search for the launch arguments text field
Then type the following:

-width 5760 -height 1080 -borderless

You may also replace borderless with “-windowed“.
Alternatively, try using

-allowResizeWindow

…and then try to stretch the frame of the window to your screen resolution (can’t do this in borderless mode)

The reason why you’re not usually able to go full resolution is that when not in surround mode, the game knows you have 3 screens but thinks that you only play in one of them so it sets itself to 1920×1080.

How to fix the UI being displaced or stretched

Some players might be able to set their screen resolution correctly, but the UI elements (the map, the menus) might show off-center, displaced or distorted. To fix this, you may want to try using -noDPIAdjust in your command line arguments list.
A special thank you to one of our users, Jon, who shared this solution by another player who helped him, NorbzFR.

You’re done!

Now bask in the glorious landscapes that this game has to offer.
They look absurdly beautiful at a 3840×1080 or even 5760×1080 resolution.

Next step: VR.

If this guide helped you, send me your best Ultra Wide Wide West Screen Shots!
Too many puns. Bang!

Stay WANTED for life,
-ViLa4480